New Year’s Eve always feels a bit bittersweet to me and this year is no exception. Right now, 2021 is shiny, new, and, full of potential. But standing on the precipice of this new year, sometimes I think about how tomorrow the year officially starts; it won’t be brand new any more and each day it will lose a bit of it’s potential. I think this feeling comes from the fear that I often have that I will not accomplish what I set out to do.
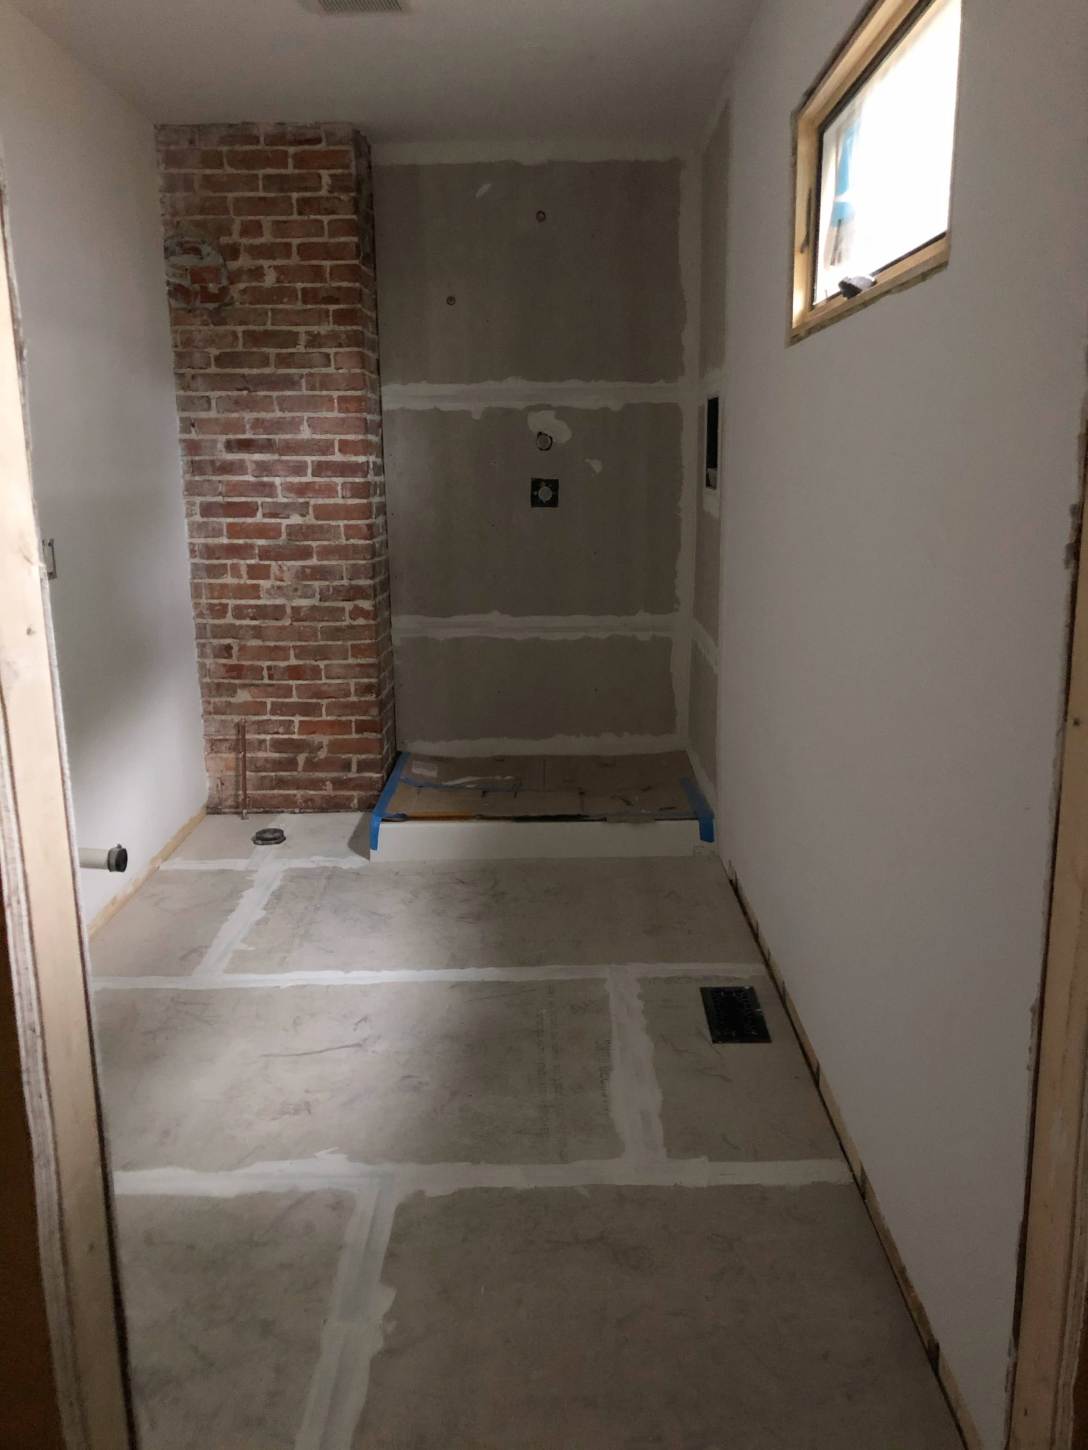
2020 was the year that I dove in hard to attempt to finally finish our ensuite bathroom renovation. We accomplished so much and have been using that bathroom daily for the last 6 weeks or so. It’s not 100% complete – still needs window trim and towel hooks and… a door… But, at the beginning of this year it was a construction zone with unfinished plumbing and electrical, no drywall, and no flooring. It’s a massive improvement.
For 2021, my renovation goals are to finish finish the ensuite bathroom and renovate the hall bath as well. There are also some miscellaneous outdoor goals too – like making progress on the walkway and landscaping project we started this summer and have since abandoned.
As far as resolutions go, I have just two. Let’s get the one I probably make every year out of the way – I want to read more. My plan is to try to replace mindless scrolling time with reading a novel. The AT&T outage in Nashville on Christmas Day really helped me go cold turkey on the mindless scrolling as we were without internet or cellular service for a few days. Lets see how many weeks into 2021 I last, shall we?
My renovation resolution is related to that fear I have of not accomplishing what I have set out to do. I’d like to not let that fear of failure get to me as much in 2021. In The Great Tile Saga of 2020, I was so hard on myself for not having a 100% perfect tile installation. I felt like a failure, a hack, an imposter. Well, we’ve been using the bathroom for a few weeks now and, I can say for sure, I do not notice any of those imperfections. They don’t bother me at all. Now, I’m sure you’re thinking to yourself… “I told you it would be fine!” and yes, yes you did.
But the important bit here is that I let that fear derail me for a few days each time. I know that striving for perfection at all times is just part of who I am – especially when it comes to the aesthetic components of a project – and that isn’t a totally bad quality. What I have realized this year is that I was subconsciously relating not achieving perfection with some kind of moral failure (shout out to @domesticblisters on TicTok who taught me that keeping house tasks are morally neutral).
I think as a society we have this idea that if you’re not an expert at something, you shouldn’t do it, or at least you shouldn’t share it with others on the internet. I obviously don’t believe that as I have a blog detailing my amateur renovation and attempt plenty of things I have never done before – but sometimes big societal ideas can creep into our subconscious in ways that are unexpected (see also: racism, sexism, ableism…). So, all of that to say, my resolution is to be aware of when those ideas are creeping in and promptly tell them to go jump in a lake.
I am truly grateful this year for anyone who followed along with this journey and encouraged me along the way. I honestly could not have done it without you. Well, you and calling my dad on FaceTime.
I hope you’ll stick around this next year as we dive into another bathroom renovation. Maybe it will take less than 18 months to complete this one…
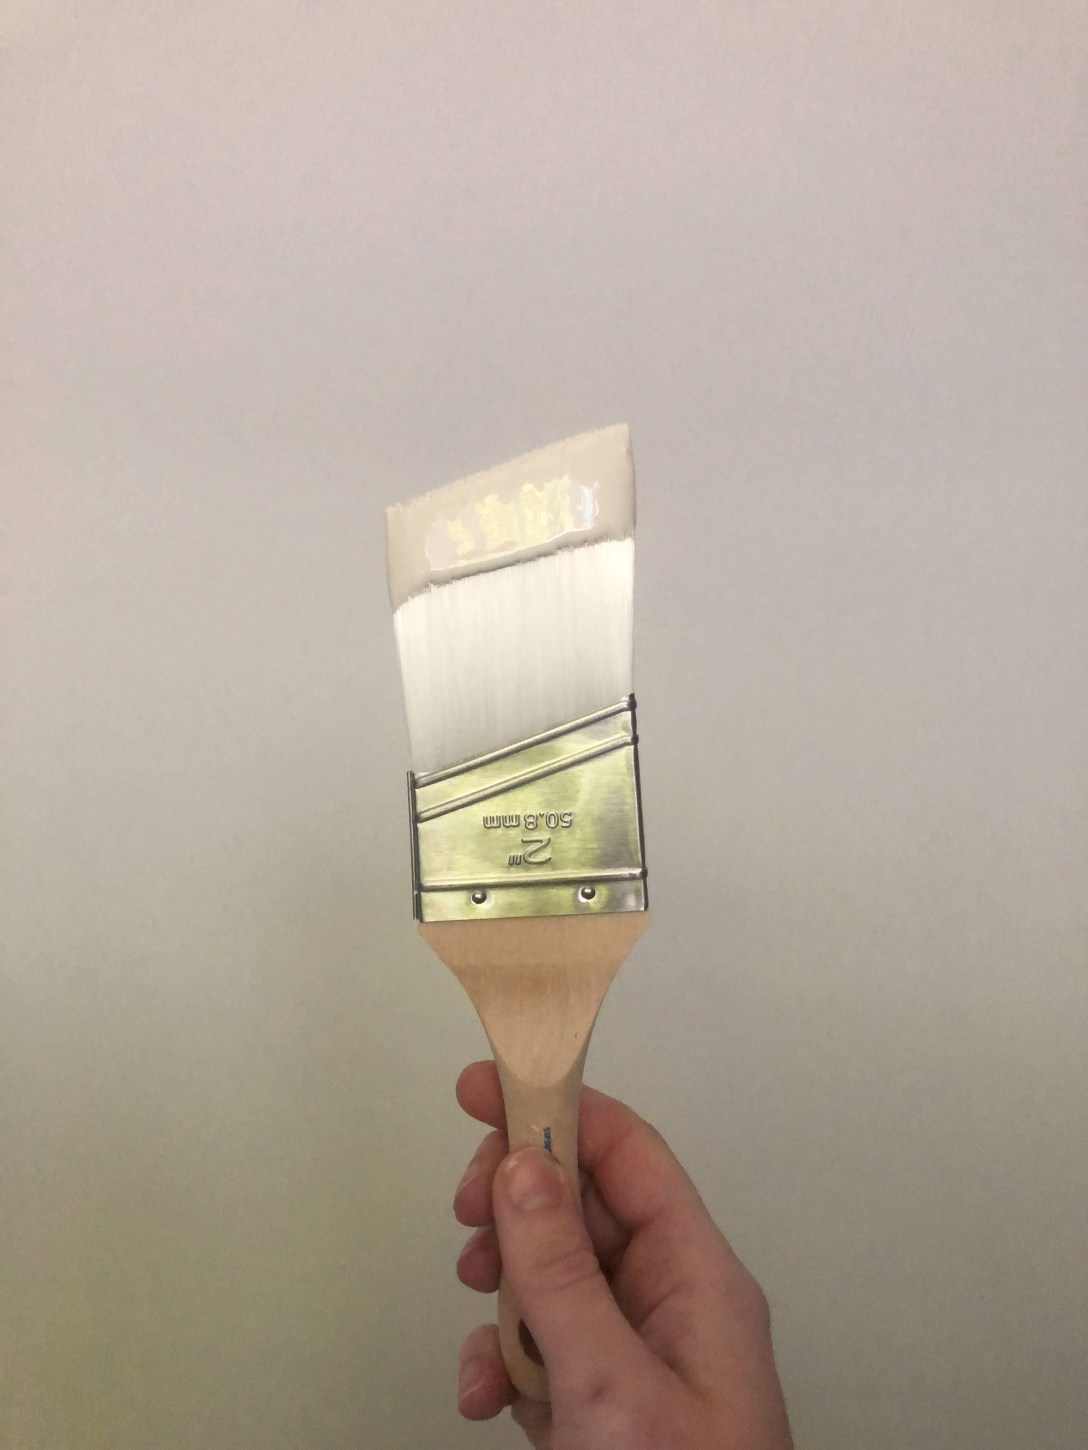
As of this writing, there are 10 days left until the absolute last day to reveal our One Room Challenge rooms and I am going to need every last minute of time. I finished painting at the end of last week which was week 6 of the ORC (technically final reveal week, but we won’t dwell on that). I thought I would do a run-down of what I used and what my process was.
Materials:
Zibra Precision Cut in Brush – I love Zibra brushes. They’re just better than everything else. I don’t know what to tell you. This is the one I use for cutting in.
Purdy Colossus 1/2” Roller Cover – This roller gives great coverage and a nice even texture. It also cleans up really nicely to use over and over again.
Shur-Line Easy Reach 5′ Adjustable Extension Pole – I really like my extension pole. It is easily adjustable so I can change the length to get exactly what I need. It has a comfy grip too and my hands don’t get too tired.
Paint:
Even though I had primed the walls months ago when we finished the drywall, it is important to prime shortly before painting, so I needed to do at least one more coat of primer over everything. I used Kilz PVA Drywall Primer. It is important to use a drywall specific primer over new drywall to seal everything in. Putting primer over drywall mud also allows you to see if there are any areas that need touching up. Part of why I primed the walls earlier this summer was because I kept messing up my drywall mud by trying to fix it. Painting it allowed me to make adjustments without messing up what I already had done.
Next, I painted the ceiling. I used Benjamin Moore Ceiling Paint in White. Boring, I know. First I cut in around the edges. I wasn’t too concerned about being precise since I still needed to paint the walls. Then two coats of paint with a roller making sure to back-roll. I think in the time-lapse video below you can kind of see the back-rolling process. Basically, after getting the paint on the wall, go back and roll all the way down in one motion and then overlap that line by about half a roller and repeat. It will give a more uniform finish. Another way to ensure good, even coverage, is to not paint in a “W” pattern that you see in all the paint commercials. Start a new line of paint about a half roller distance away from where you just were. Spread that out while trying to roll the whole length of the wall (or ceiling). My painting professional friend taught me that and I really think it makes a difference in the outcome of my painting projects.
On the walls, I used Benjamin Moore Aura Bath and Spa paint in Revere Pewter. This paint only comes in a matte finish but is super durable and is also mildew resistant. Apparently the reason why it only comes in a matte finish has to do with that mildew resistant quality. It went on so smooth and covered really well. I was a bit hesitant about the matte finish as I usually use satin finishes in areas like kitchens and bathrooms but I can already tell this paint is not only beautiful on the walls, but durable too. As I’m writing this right now, I’m realizing that I probably should have chosen the Aura Bath and Spa paint for the ceiling as well due to the mildew resistant properties, so we’ll see how well the ceiling paint holds up in comparison to the walls.
I did not use tape for the ceiling corners and decided to cut in free hand. I made some mistakes, but it was easy enough to go back and touch those up later. I loathe taping things off to paint. It just takes so long and I never feel like it turns out right (and yes, I’ve heard of the painting over the tape trick). I’m not the best at cutting in free hand, but I figure, no better way to improve but to practice!
I didn’t stop to take any pictures of just the paint and rolled right into installing the sconces, vanity, faucets and toilet in the few days following finishing up painting. I am thrilled with how this room is coming together.
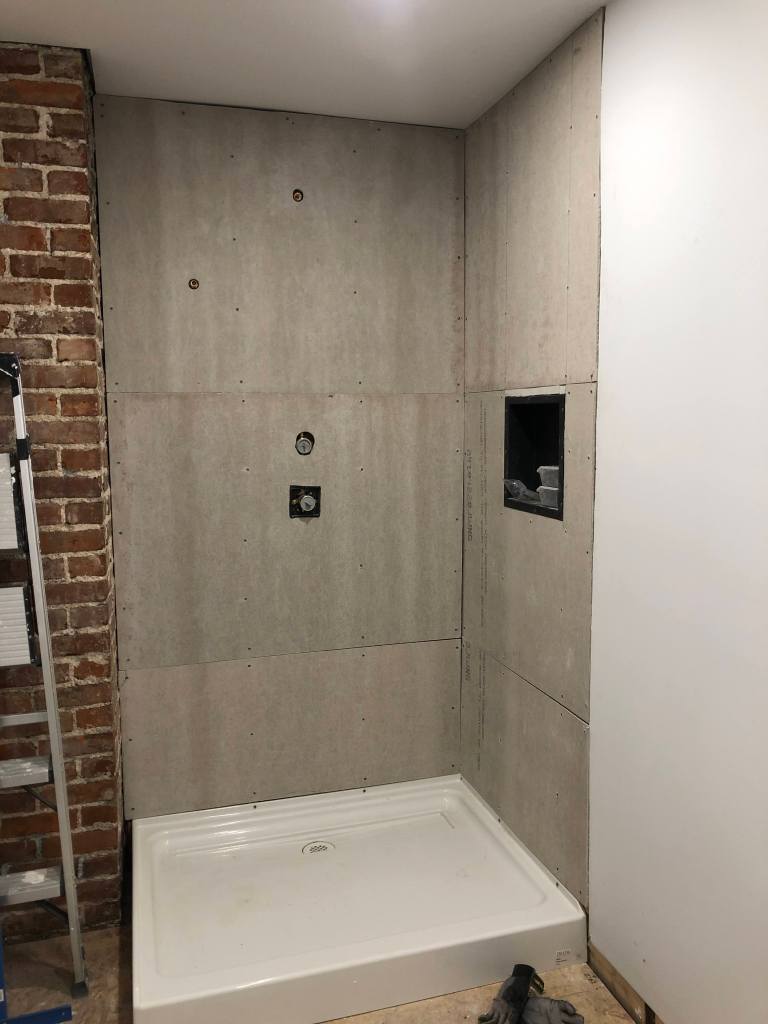
I love this picture because of the light coming in through the window and also that the shower wall and niche are reflected in the mirror. I picked the color Revere Pewter because I thought it would play well with the brick and it also matches the grout color of Alabaster from Mapei almost exactly! You can also see here I painted my outlet covers in the same color. I like that they blend in to the wall. Everything is coming together and feeling quite intentional. I was worried that since this project has taken me so long to complete that the choices I have made along the way wouldn’t work together well once they were all in the room together. I do not think that is the case!
So, what’s left? Finishing touches, mostly. I have ordered shower doors which may get here and get installed before the deadline to the One Room Challenge, but they might go in after. I also picked up some art earlier this week at a local shop and some maple 1×6 and 1×4 boards to make some baseboards and window casing trim. We still need some towel hooks and bathroom organization stuff too, but that may come later.
Stick around to see the dramatic conclusion to our One Room Challenge adventure!
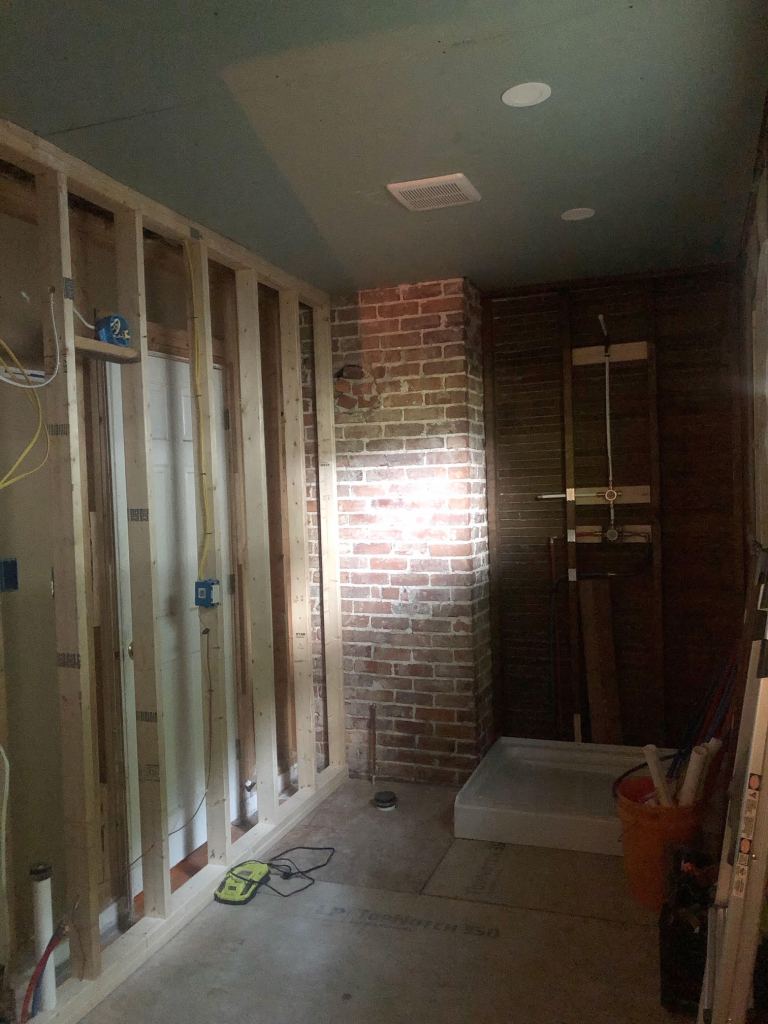
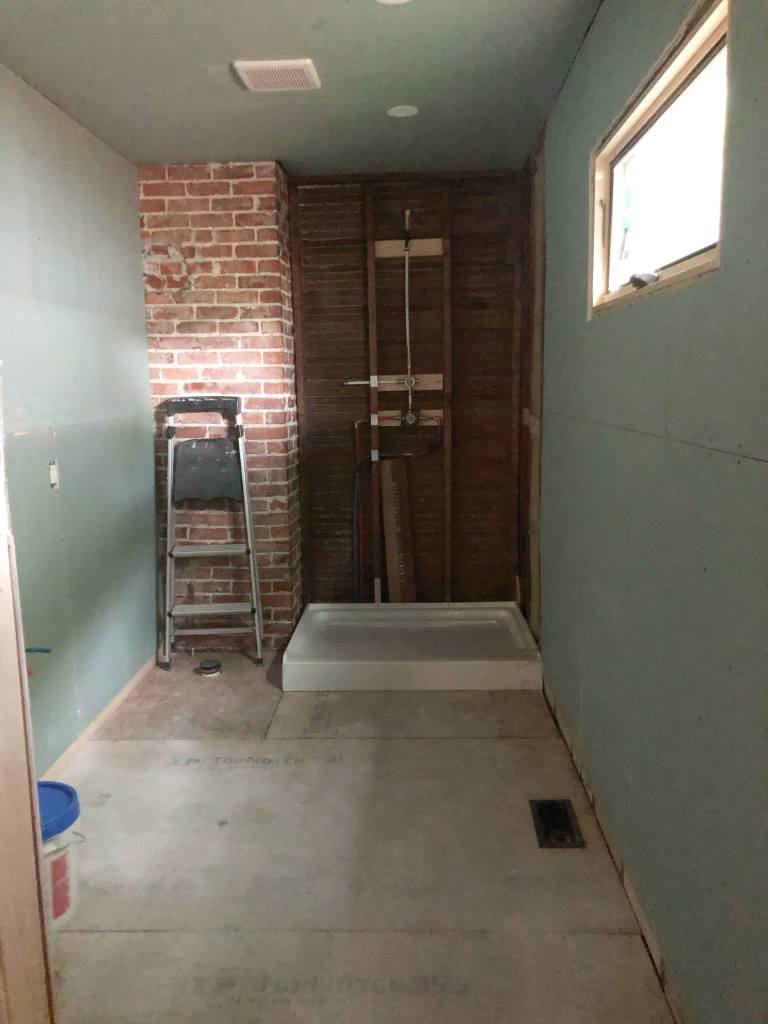
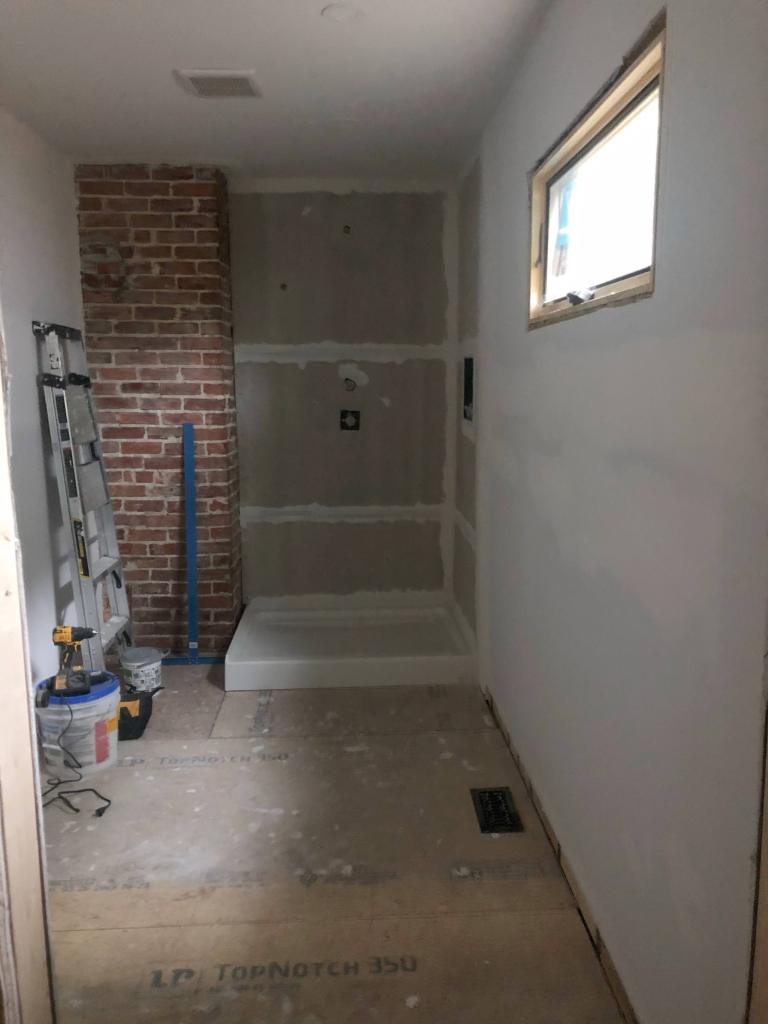
Today is the official last day of the Spring 2020 One Room Challenge. Most reveals were posted on June 24th, but many – now including mine – have been trickling in since then. Don’t get too excited, the bathroom is not finished. But a lot of progress has been made in the last 2 months. Let’s remember what the room looked like on May 7th:
It still very much looked like a construction site. Walls were framed, electrical was mostly complete, plumbing was mostly complete, insulation was partially installed, some drywall was up. In the 2 months since my dad left after coming to help us finish framing and install our new window, the room had become a dumping ground for all of the junk we didn’t want to deal with. We were, after all, figuring out how to live in a global pandemic with a toddler and work from home during quarantine.
So, knowing that I had a mountain of work left on the bathroom, I entered the One Room Challenge as a guest participant. What did I have to lose? Nothing. (Except the feeling of defeat watching everyone’s beautiful room reveals knowing that I was probably still months away… )
Prior to starting the ORC in May of 2020, we already been working on this project for quite some time. We started with demolition of the old bathroom in April 2019. As with most renovations, we ended up with more than we bargained for and needed to completely rip up the sub-floor, reinforce and level all of the floor joists, run a new ground wire to prepare for new electrical, run all new water lines and drain lines, remove a window, add a window, frame and cut a new door opening… you get the picture. But we just are here to talk about the last 8 weeks.
Week 1:
The first step was cleaning up the space and getting organized. That’s honestly all we did the first week. One thing I have learned during this long renovation is to always put everything on the to-do list. The second most important thing is to keep my workspace as tidy and organized as possible. It makes it easier to jump in and do a bit of work when I have a moment at nap time or in the evenings.
Week 2 and 3:
Plumbing. We had run the water and drain lines for the double vanity months ago – before the subfloor was installed. I’m going to be honest, I kind of forgot how much more plumbing we needed to do when the ORC started. This error probably contributed to the hubris I had when I started that there was any chance I would finish in the time period. With vanity plumbing there are two main options: plumbing coming up from the floor or out of the wall. The wall option is a bit more work on the front end, but I think it will give us an easier time later when we tile since we won’t have to tile around water and drain lines in the floor. It will also make it more possible to switch out the vanity sometime in the future if someone wanted to.
Finishing the shower plumbing happened somewhere in here as well. (What is time anymore, anyway? I feel like this whole year is Jeremy Bearimy). There’s a whole post about theshower plumbing if you want all the details.
Week 4:
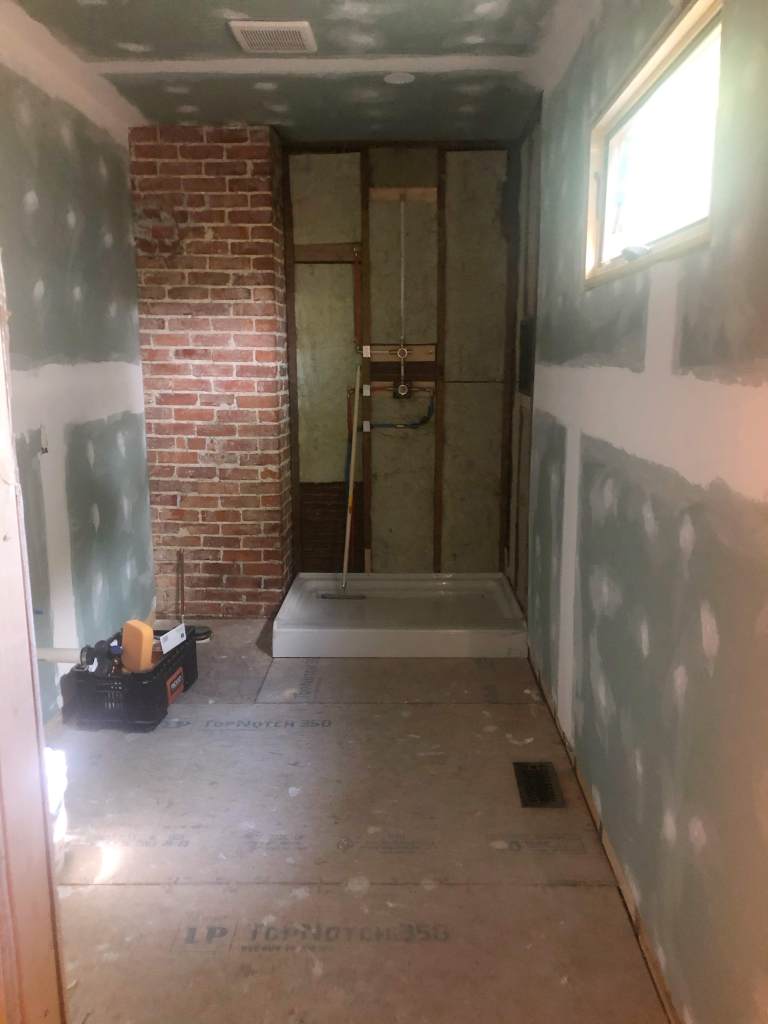
Drywall installation: this is where I started to feel like progress was moving quickly. Drywall up on the walls made such a HUGE difference in how the room felt.
Drywall taping and mudding: this is where I started to feel like this project would drag on forever.
Unlike many people, I actually enjoy the process of taping and mudding drywall seams. There is something therapeutic about it. I like to have a project that I can throw some headphones in and knock out a bit of in the evenings – and mudding is definitely one of those things. I learned a lot in the process and I plan to write something more detailed with all of my drywall mud tips in the future. There are some steps that can be taken to minimize the need for lots of sanding, which is always everyone’s drywall finishing complaint.
Week 5:
Week 5 we went dark. The heaviness that our country is dealing with warranted some time for quiet self reflection. In this house, we believe: Black Lives Matter. Love is Love. Science is Real. Women’s Rights are Human Rights. Injustice anywhere is a threat to justice everywhere.
I have been so proud to be part of the old house community in this moment. So many accounts are speaking out and using their voice and platform to amplify Black voices and educate others on matters of racial injustice. I used to compartmentalize my politics and my renovation story, but through these last few weeks it has become increasingly clear that is not an option. It’s all connected. We’re all connected. It’s important to be vocal about the things I think are right.
Week 6:
Primer. Drywall primer is an important step of any new drywall installation. Unlike paint, drywall primer will soak into the drywall and seal it and the mud (which is water soluble). Getting that primer up on the walls accomplished two things:
1. It stopped feeling like a construction zone and started feeling more like a real room, and
2. Brought out the imperfections I needed to fix in some of my seams – so, more mud was in my future.
Week 7:
Cement Board. I had never installed cement board before this project. I figured, how hard could it be? Seems like it would just be heavier drywall. Boy was I wrong. Cement board is a pain. It’s difficult to cut; I had to go buy new tools (but who doesn’t love an excuse to get new tools!); and kneeling on it really hurt my knees (I have since invested in some knee pads). The tools I needed to acquire were: a carbide grit hole saw set, a jigsaw (how I didn’t already have this, I’m not sure) and some heavy duty metal cutting blades for the jigsaw.
After some trial and error, the cement board went up in the shower and I was able to tape the seams and cover them with mortar.
One issue we uncovered during cement board installation was that, since the outside wall of the house is bowed, there was more than a quarter inch difference between the cement board and the drywall in some places. I was very distressed by this initially, but, as we’ll see – it turned out just fine!
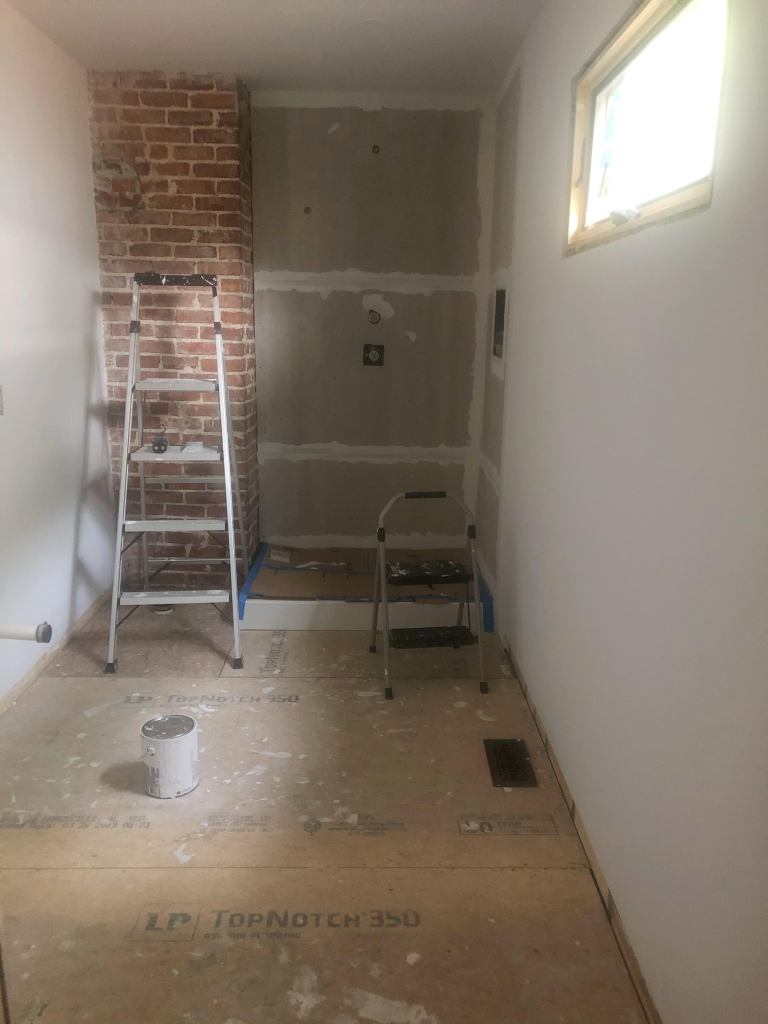
Week 8-9:
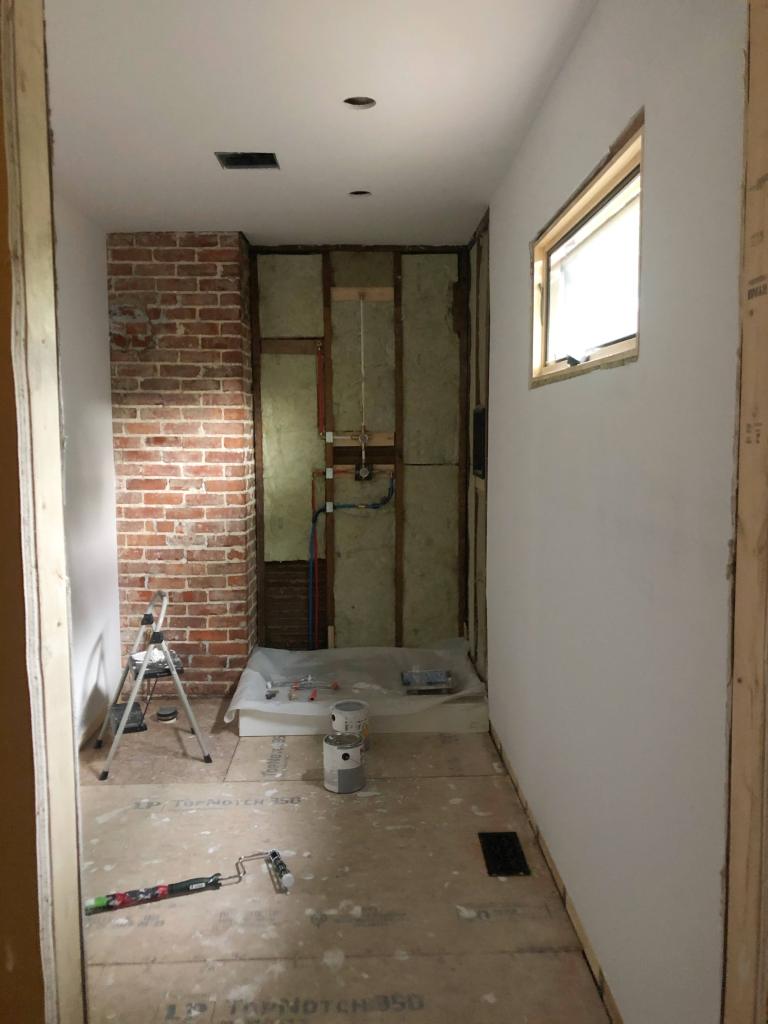
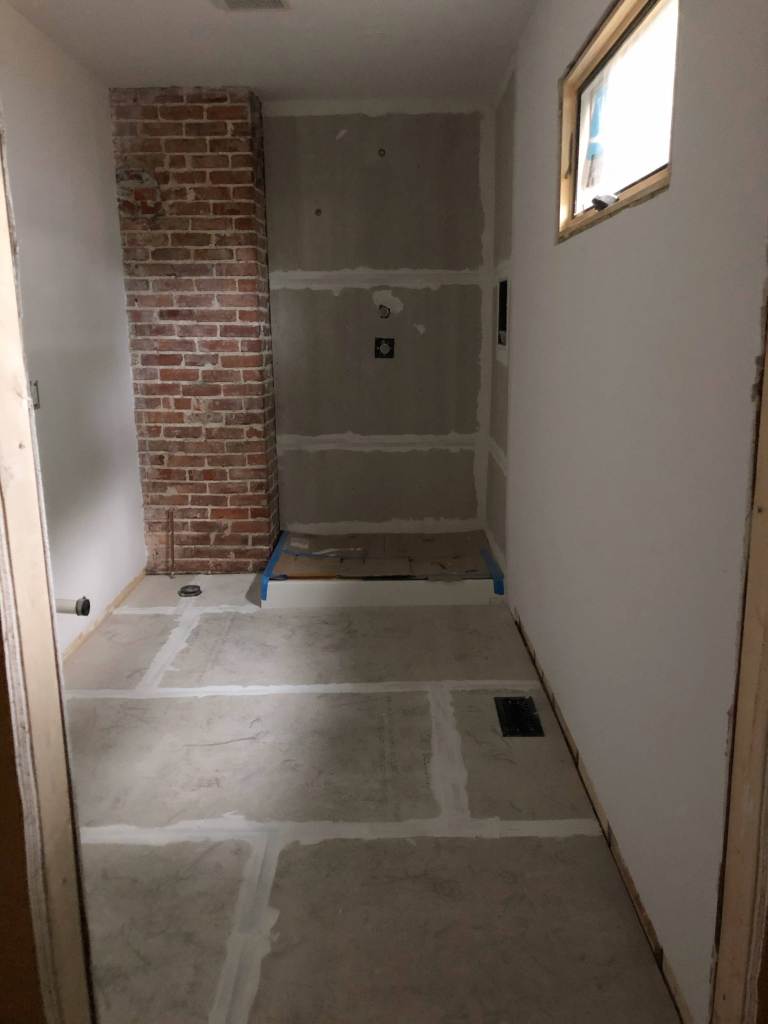
The last two weeks have felt slow because I didn’t make any dramatic visual changes to the room. I needed to work on fixing the issues with my original drywall seam finishing job. There was one seam where you could see a lump all the way down the top of the seam. Primer can help bring those imperfections out and it actually makes them easier to fix because the mud underneath is sealed in and you can’t make it worse. I also needed to level out the seam between the cement board and the drywall that I mentioned earlier. It took several days because I only did one coat per day, but I think it turned out really well. In addition, I wasn’t happy with the size of the gap between the drywall and the exposed chimney, so I used mesh tape to get a little closer – which meant I needed to mud that as well.
There were a few other spots here and there that needed some touch-up with the joint compound (mud). Once I finished that, it was time for another coat of primer on the walls. I also worked on sanding a spot on the subfloor that was a bit unlevel.
This weekend I have been working on getting cement board down on the floor in preparation for tile. This time, I have some better tools that are really making the process easier than when we did the shower. I have knee pads, which is making it far less painful to kneel on the cement board while cutting it or while screwing it to the floor. I upgraded my cordless drill from my trusty 10-year-old Ryobi to a DeWalt a few weeks ago and it has been SO much easier to use. Using the carbide grit hole saw went twice as fast with my new drill, and fastening the cement board required way less force. I can’t believe that I waited so long. Seriously, thinking about how much faster the drywall would have gone up with this drill almost makes me want to cry! I also got better blades for my jigsaw – blades for cutting thick metal seem to be working the best, but they don’t last long. I did not get enough of them and had to go back to the store for more.
The Reveal:
My reveal is a transformation from a construction site to a room with walls, ceiling and a floor and plumbing and electrical ready for installation of all the pretty features. In the grand scheme of things, it’s a massive amount of progress in just 8 weeks.
Don’t forget, I still have a full time job and a toddler at home! Sometimes I need to remind myself of that because it seems that others are able to get things done at a much faster pace. It’s important to remember that everyone has different circumstances and I can only do what I can do.
I’m not giving myself a timeline for finishing the room, but here is the list of things we still have to do (probably close to the order I’ll do them in):
Tile floor
Grout floor
Apply Red Guard water-proofing to the shower
Tile shower
Grout floor
Prime (again, I know) and paint ceiling and walls (x 2 coats)
Install shower plumbing fixtures
Install toilet
Decide on a vanity and sink fixtures
Install vanity and sink fixtures
Install vanity lighting
Install door
Figure out what we’re doing for trim… and do that.
So, the ORC challenge is over – but, life and renovations goes on! I’ll keep plugging away at this bathroom until it’s done. And then… we’ll demo the hall bath and start the whole process over again…
But what if the real One Room Challenge was the friends we made along the way?
Right away, the camaraderie that I felt as part of the ORC was wonderful. I met a bunch of great people who were also working on bathrooms like Sachi Lord and Jenna Beach. I became closer with insta-friends I already knew who were participating like Mary from @homebuggie. The online DIY/old house/renovation community is truly a special place that I am so grateful to be a part of, especially now when we are all isolated from our in-real-life friends.
It’s interesting to see the designers renovating their rooms alongside the “regular” folk. Mostly, it’s inspiring to see what they are creating. (Sometimes it’s a little discouraging, but that is a post for another day.) I am forever grateful to Stephen and David of @renovationhusbands who shouted me out and encouraged me so much along the way. Their bathroom/bedroom/closet renovation is truly a work of art. The detail and precision they bring to their designs is really inspiring. Plus, they’re just delightful human beings!
So, despite not actually finishing my room, I’m glad I joined the One Room Challenge this year. Next time it rolls around, if you’re considering joining but not sure if you’ll finish – what do you have to lose?
While everyone has been learning how to bake sourdough, I have been making pizza. In late March, I was struggling to determine which staples to keep in the house that a) would last between grocery runs, and b) all members of my family would reliably eat. If you have ever lived with a two-year-old, you know that what they voraciously devour this week, they will altogether refuse the next.
With the exception of pizza. Pizza is ALWAYS a ‘yes’.
Frozen pizza is never quite as satisfying as I’d hope and, takeout pizza isn’t something I can feel good about eating on a regular basis. I have discovered that it takes very few ingredients to make delicious pizza dough from scratch and have now made pizza Friday a weekly tradition.
I use the NY Times Cooking Recipe for Roberta’s Pizza Dough . [If you just want a no-nonsense recipe for dough without any snarky commentary, just click that link. No hard feelings, we’ve all been there… “Just show me the recipe already, lady!” But If you’re here for the commentary, keep reading.] About 4-5 hours before you want to cook your pizza, you’ll need to start the dough.
Here’s where the working from home bit kicks in: if I was going in to the office on a regular basis, I wouldn’t have time at lunch to make dough. If you’re extra lucky, you will have just put that two-year-old down for a nap. I usually start around 12:30. Here’s what you’ll need:
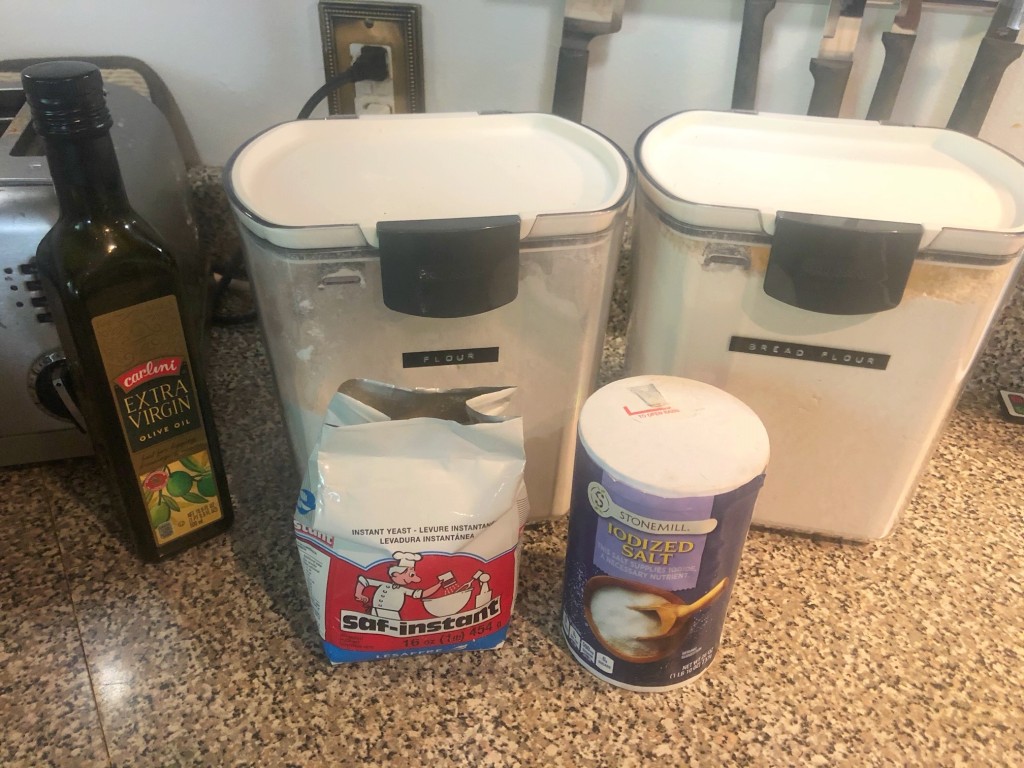
2 cups + 2 tablespoons flour (Note: the original recipe calls for about half bread flour and half all purpose. I have recently acquired bread flour and it does make the crust a bit more crunchy on the outside but chewy on the inside, however, no one else in my family can tell that I switched from using all all-purpose flour.) 1 teaspoon salt 3/4 teaspoon active dry yeast 1 teaspoon olive oil slightly less than 1 cup of lukewarm water
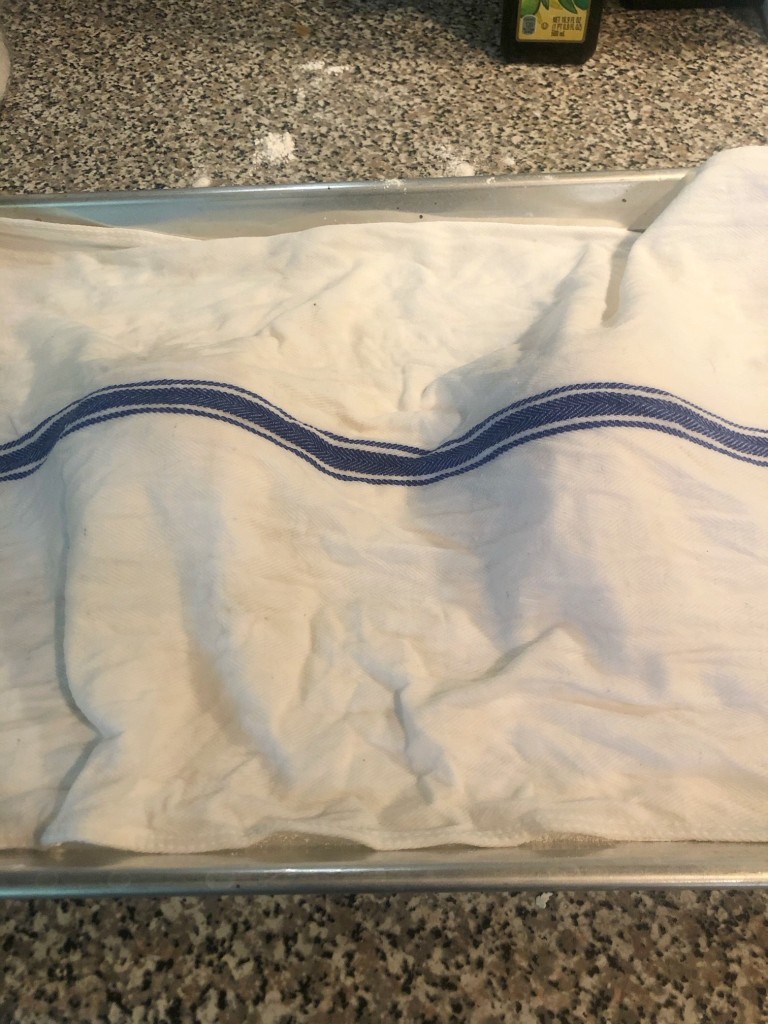
Step 1: Combine the yeast, olive oil and lukewarm water. I do this right in my liquid measuring cup. Set aside for the yeast to do its thing. Step 2: Mix the flour(s) and salt together. I don’t bother to sift it, just whisk everything together in a big bowl. Step 3: Pour the yeast/water/oil mixture over your flour and mix with a wooden spoon or spatula until its mixed enough to start using your hands without it being too messy (you’ll know.) Step 4: Knead the dough right in the bowl for about 3 minutes. Sometimes I need to add a sprinkle of flour to keep it from sticking, sometimes not. I think it depends on humidity or whether or not the kitchen fairies are happy that day. Not sure – when in doubt, just add a little flour! Step 5: Let your dough rest for 15 minutes. Clean up the mess you made in the kitchen or start some laundry or check your emails. (Or, let’s be real, scroll on Instagram and watch how-to videos on YouTube about drywall mudding) Step 6: Knead that dough for another 3 minutes. I don’t know if there is a particular way you are supposed to do this. Go with your gut. Push the dough, fold it, pick it up and drop it, repeat… I just go for whatever it looks like they’re doing on the Great British Baking Show. I’m sure Paul Hollywood would be appalled at my technique though. Step 7: Separate the dough into two even pieces and form into balls. Don’t stress, it doesn’t really matter if they are perfectly even, I’m sure you could weigh them if you wanted – but who has time for that! Put those balls on a floured cookie sheet and cover them with a damp cloth. Wait 3-4 hours. This is the perfect time to go do some drywall mudding, or prime the walls, or whatever the project of the week is.
Dough after adding water/yeast/oil mixture. This is what it looks like when I start using my hands
After first 3 minutes of kneading
After second 3 minutes of kneading
Dough balls on my floured surface
all covered up and ready to rest for a few hours!
Step 8: About an hour before you want pizza, you’ll need to put thepizza stone in the oven and pre-heat to 450o. [If you have my oven, you’ll pre-heat to 350o, then, when it beeps, you’ll know it’s lying and the temperature in the oven is only 225o and you’ll turn it off and back on again and pre-heat to the actual temperature that you want which is 450o and then probably also have to add 25 – 50o to get the actual temperature in the oven to 450o… Kitchen renovation coming-soon]
Step 9: We’re ready to start assembling the pizza. Here’s what you’ll need:
parchment paper cornmeal pizza sauce (You could get fancy and make your own sauce like Deb at Smitten Kitchen which I’m sure is delicious like everything she does, but I just use Publix Pizza Sauce from a jar – remember, we’re in a pandemic – I’m looking for shelf stable staples!) shredded mozzarella marinated artichokes ricotta sea salt pepper
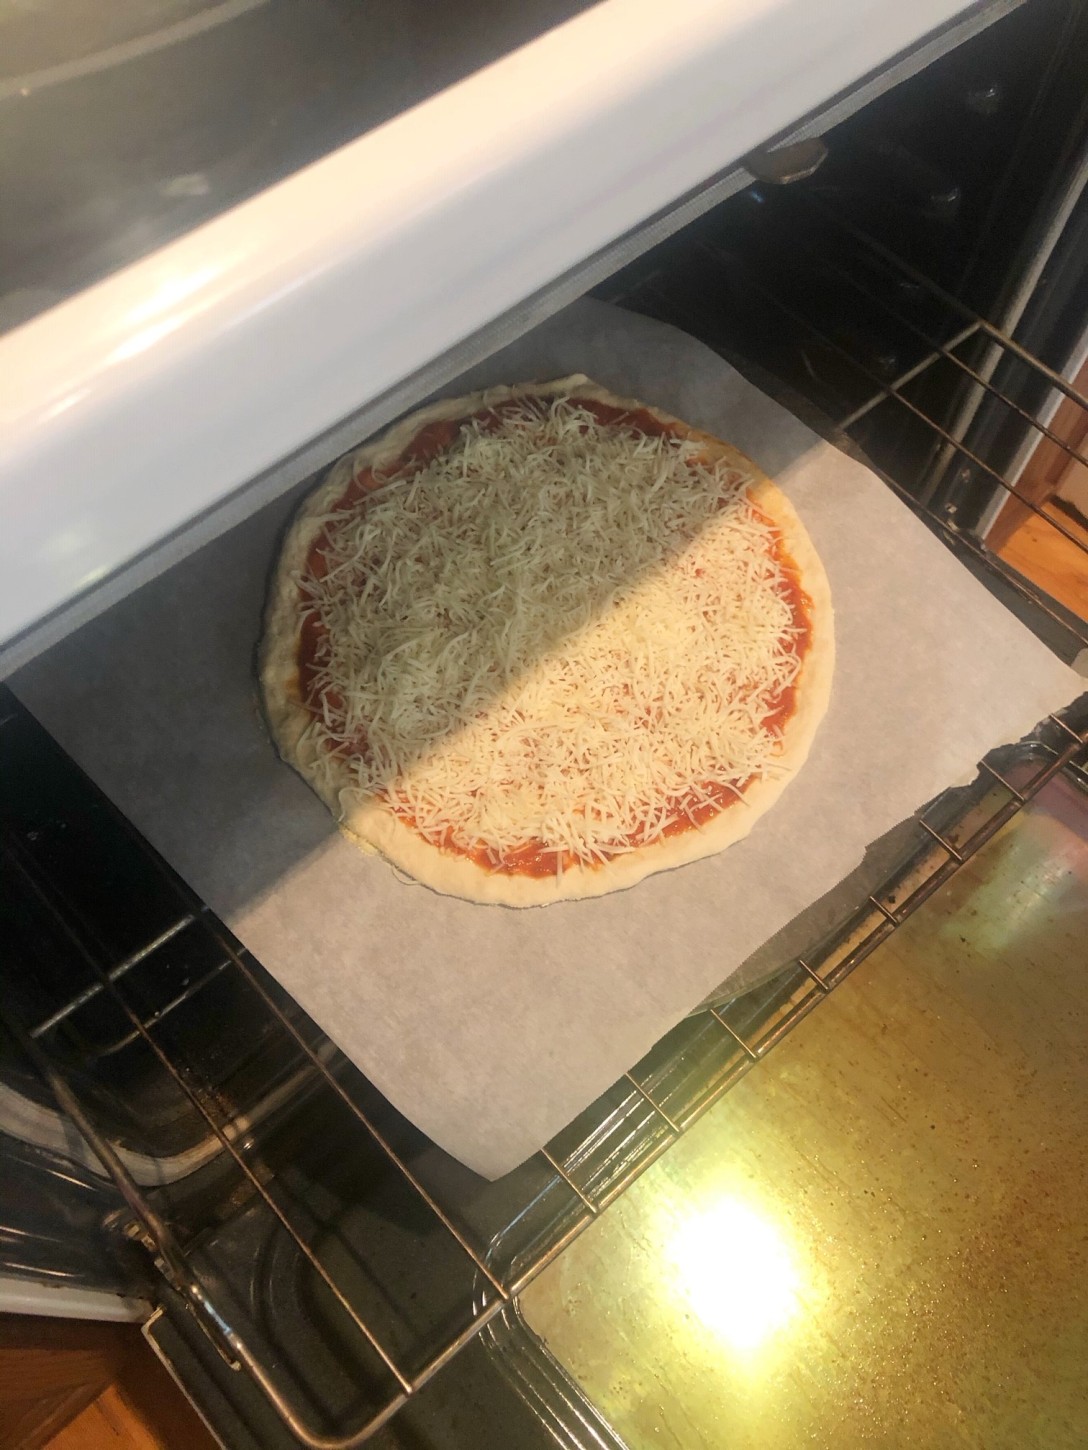
Put a piece of parchment paper about the same size as your pizza stone down on the counter and sprinkle it with cornmeal. Pick up one of your glorious balls of dough. Pat the air out of it a bit. I stretch it some in the air before putting it down on the parchment. Now just kind of press and stretch the dough out until its the size and shape that you want. If it sticks, add more cornmeal underneath.
You can go wild here with whatever ingredients you want but I usually make one plain cheese pizza (hi, I have a toddler) and one artichoke and ricotta pizza. This is important: Make the plain pizza first. Trust me, you’ll thank me later when your child isn’t throwing a fit because his pizza is too hot to eat or it’s not quite ready yet but he can smell it because you made the other pizza first. Ask me how I know… Also, pour yourself a glass of rose while you do this step – it’s Friday!
Step 10: Once you have your pizza assembled on the parchment. Open the oven, pull out the rack a bit, pick up the parchment and lay it down on the stone. Sometimes you have to play around with where to hold on the parchment so the pizza doesn’t fold in half. I don’t know what the secret is, just pray to the pizza gods.
Step 11: After 4-5 minutes, try to pull the parchment paper out from under the pizza. I push the pizza with a wooden spoon while pulling the parchment out. If it doesn’t slide out easily, it’s too early, wait another minute or so.
Step 12: When the pizza is done, take it out! I think this takes about 12-15 minutes total from when it went in but I actually never use the clock, I just kind of check and guess. I’m in the kitchen anyway making my second pizza or sitting on a stool and drinking my wine waiting for the pizza to be cool enough to announce it’s arrival to the toddler.
Step 13: Repeat for the “adult” pizza. I make this exactly the same except I add some chopped marinated artichokes, a few dollops of ricotta and some sea salt and pepper to the top. Still don’t know how long it takes in the oven, sorry. You’ll smell it when it’s done but before it burns, I promise.
Step 14: Eat your pizza. Drink your wine. Revel in the fact that everyone, including the two-year-old, has eaten all of their dinner, asked for seconds and complimented the chef.
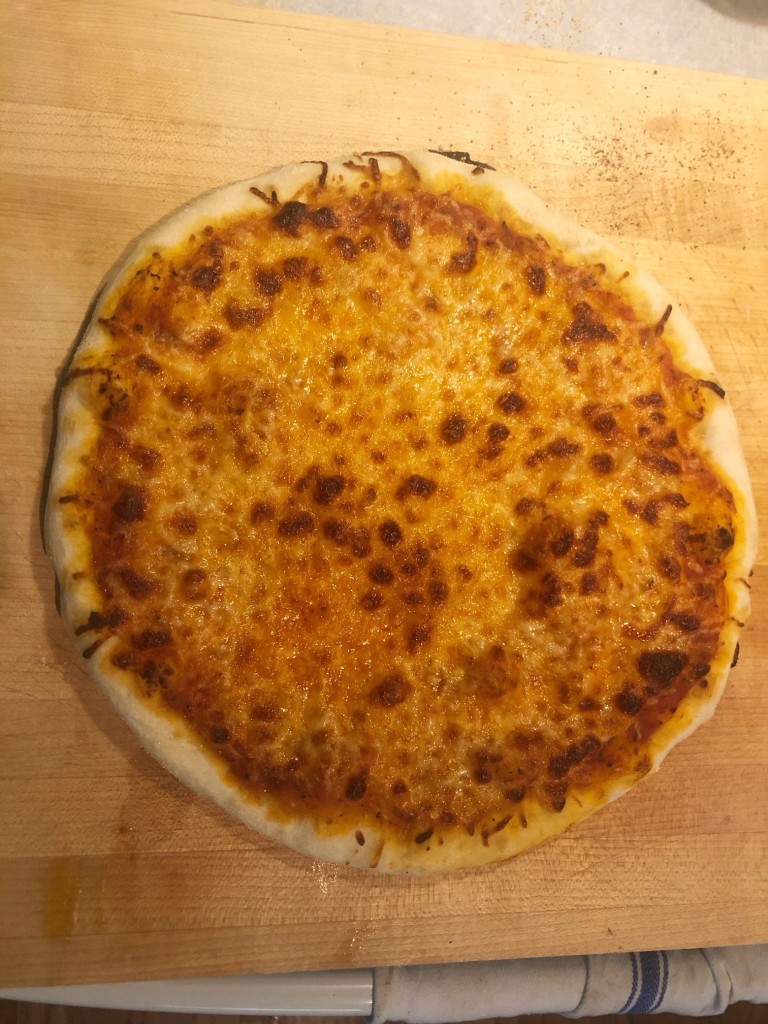
This pizza probably stayed in the oven for 1-2 minutes too long. Still good though!
Note: I have read that you can make this recipe and let it rise in the refrigerator overnight. I haven’t tried it. I’ve also read that you can make a double batch and then freeze half for later. Also haven’t tried it. If we ever go back to the 40 hour in-person work week, I’ll have to try these methods, but for now, in quarantine, lunch time pizza dough on Fridays will continue!
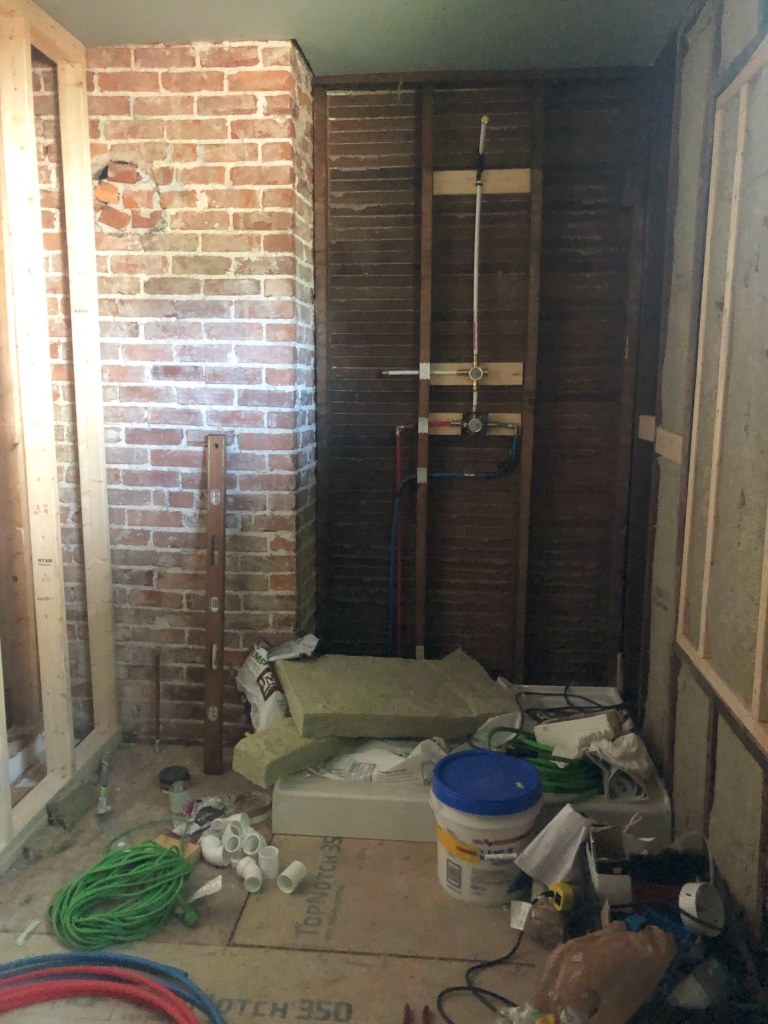
We’re finally putting up cement board in the shower and the plumbing for the water lines will finally no longer be visible, so I thought it would be a good time to take one last look at it.
What we did
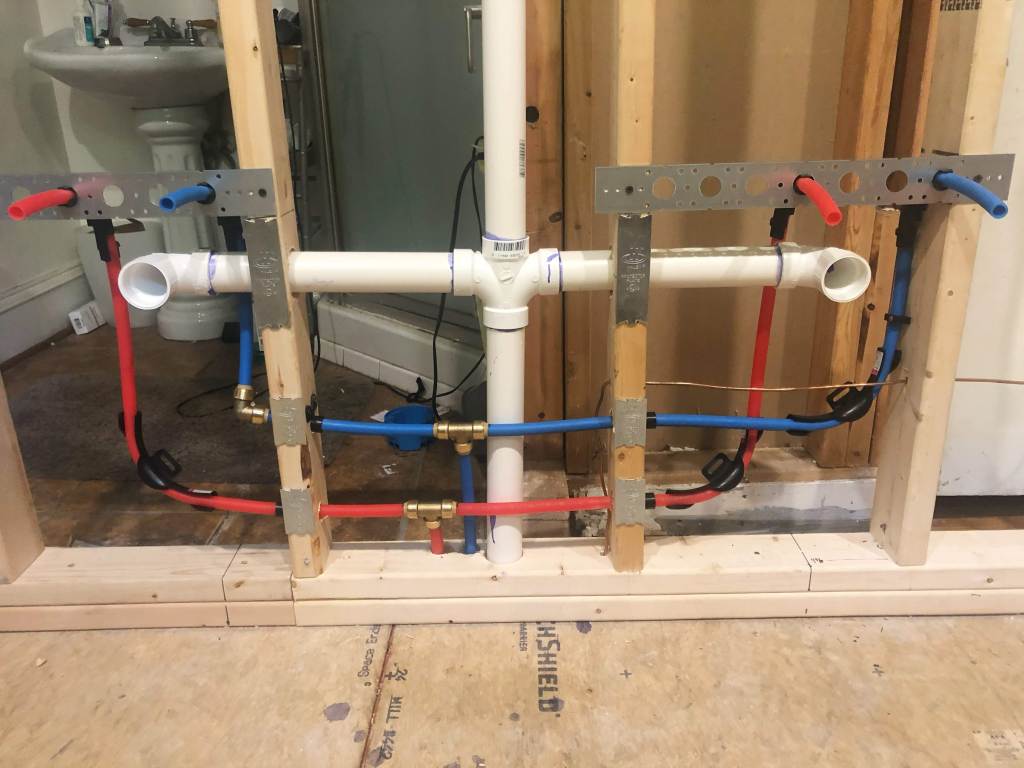
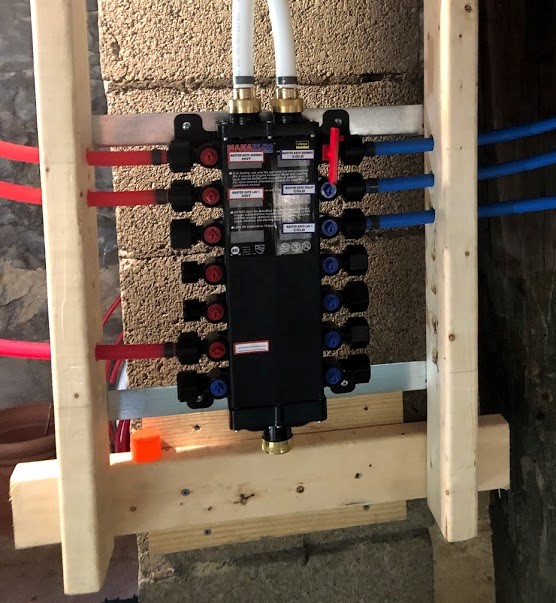
The existing water lines in the house were CPVC and were not in good shape. Originally, my dad wanted to run new copper water lines. He ran out of time when he came for his visit to help us and, since we had no experience with copper, we decided to go with pex. A little research led me to find the Viega Manabloc system.
Our Viega Manabloc Pex Manifold System
What we like about this system:
It was easy to install. We made a frame out of 2x4s and hung it from the ceiling joist. There was a template to drill holes in the sides of the frame to support the pex exiting the manifold.
It has room to grow. We could run new water lines to our master bathroom while keeping the old water lines to the rest of the house. As we gradually renovate the whole house, we will be able to run new lines from this manifold and eventually have replaced all of them.
I like that the lines can be run in red or blue to indicate hot or cold. The system also came with labels to keep the manifold organized.
Another benefit of pex is that there are fewer connections and joints. Less connections mean less places for leaks. Because the lines are flexible, you can run them as “home runs” which means that there is one continuous line from the manifold to, for example, the toilet. This also means that we can control the flow of water to one fixture at a time. If, for example, we wanted to do some work on the shower, we can turn of the water to just the shower and not have to also turn off the water to the rest of the house.
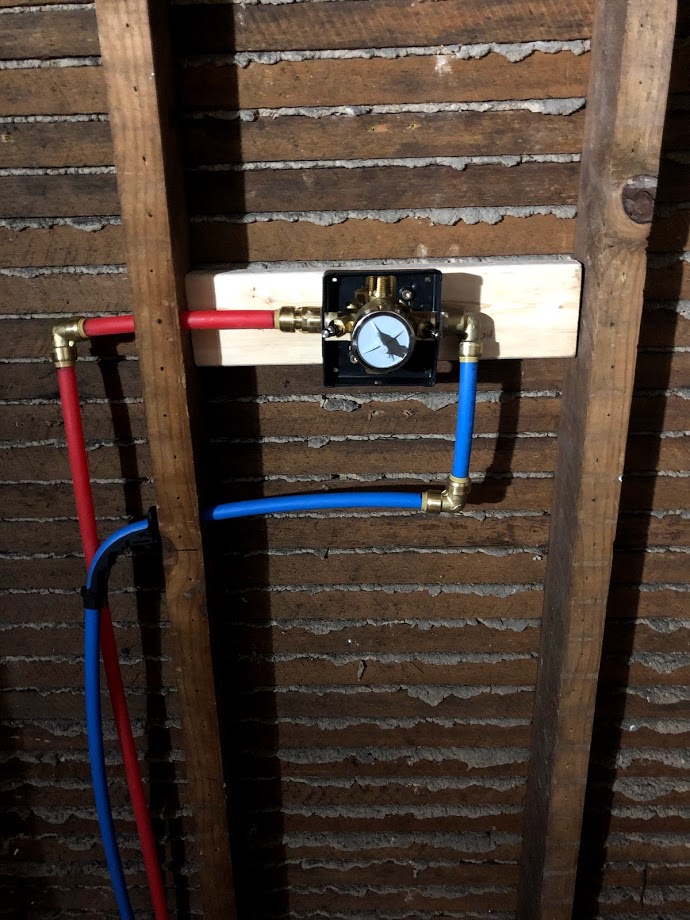
After installing the manifold, we ran one hot and one cold line from the manifold to the master bathroom shower. The lines are secured to the joists in the crawlspace with hanging supports.
Once we had the water lines in, we could plumb the shower.
My first attempt resulted in being unable to tighten the cold water connection to the shower diverter enough to prevent leaks.
I was able to re-work it to improve the connection to the diverter, but I did end up having to add another connector than if I had known what I was doing from the start.
I also should have used a bend support for the hot water connection instead of the 90 degree connection, but I didn’t have enough length to do that. Overall, I don’t think two extra connections are the end of the world, but next time I’ll know better.
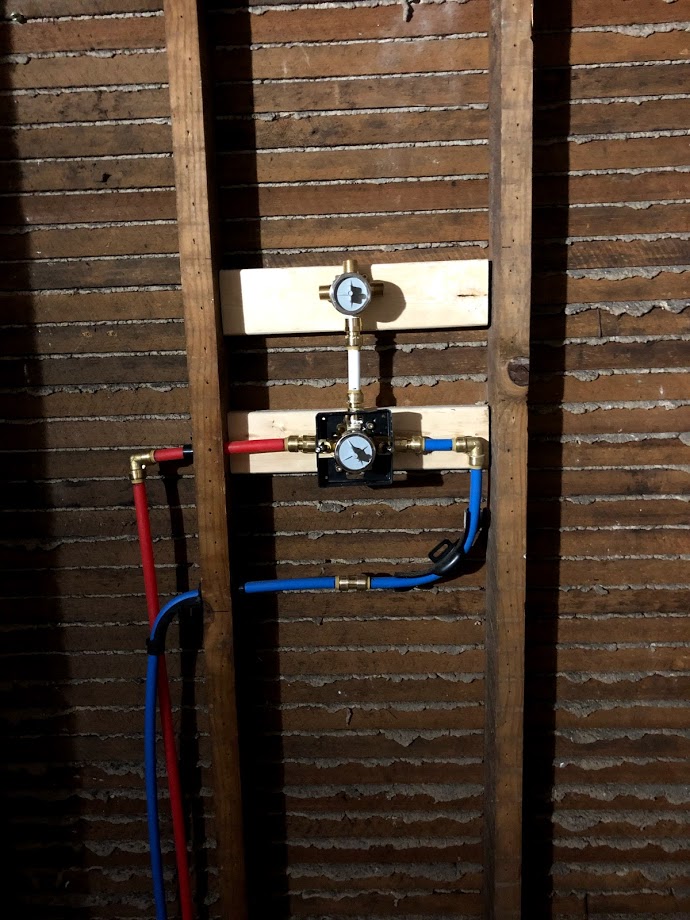
It was more difficult than I had thought to get the connection between the main diverter and the diverter for our future hand shower just right.
First attempt, leaky cold water connection
Second attempt, no leaks!
with the connector to the hand shower diverter
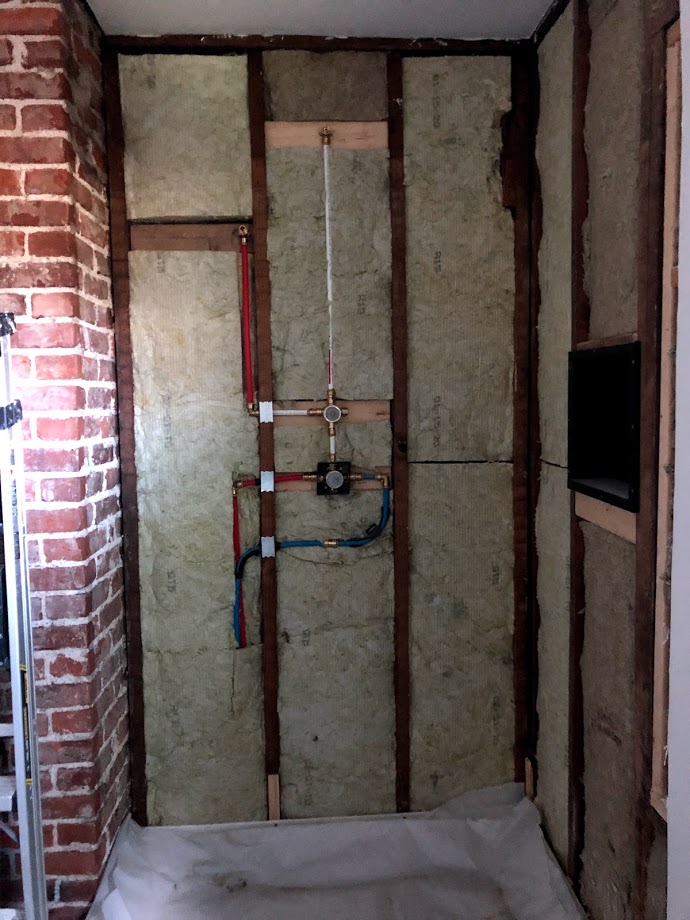
The shower plumbing looked like that for quite a while. I needed to wait until I had the actual fixtures purchased to make sure I was making the correct stub-outs. A few days ago, I finally finished plumbing all of the connections. And now she looks like this:
Current state of shower plumbing.
I added a threaded connection at two locations: 1. for the main shower head and another for the hand shower. The main shower head needed a female connection, but the hand shower required a male thread. We filled in with rock-wool insulation which will help dampen the sound of the shower through the shared wall with the living room. We are ready to add cement board and get ready to tile in here now! It feels strange that after looking at this exposed plumbing for almost a year, I will never see it again (fingers crossed).
What I would do differently
I’ve touched on a little of this already, but there are a few things I would be sure to do differently the next time we run water lines and plumb a shower (coming soon, hopefully this fall).
I would make sure to have enough length on my pex to have as few connections as possible.
It has been pointed out to me by some friends that the SharkBite connectors I used are expensive, and I would have saved money using press or clamp fittings. I have RA and my hands just are not strong enough to use the pex press tool that we have, which is why I used the SharkBite here. I might attempt to plan out my connections and have Connor use the press tool for me for our next shower, but I might not. Jury is still out on that one. I am often willing to pay a little extra in order to be fully independent on a project.
What’s next
Cement board on the walls
Tile
We have picked out a white penny tile and haven’t decided on grout color yet.
Installing the fixtures
We’re using the Delta Vero rain shower system in champagne bronze. And no, I did not pay full price. eBay for the win! Getting this system at the price I did is one of the greatest accomplishments of my life.
Delta Vero Shower in Champagne Bronze. I cannot WAIT to see this installed!
I live in a 1920s craftsman in Nashville with my husband, our son, two dogs and two cats.
I have always lived in a fixer upper, really. One of my favorite pictures from my childhood is me in overalls carrying my toy tools while wearing my dad’s safety goggles standing in the construction area of the renovation they were doing at the time.
When I was in 6th grade, we moved across the street to fulfil my dad’s dream of living on waterfront property. We left a house that my parents had lovingly renovated over the course of a decade, to a house that needed just as much, if not more work. I will never forget that November when, right after the contractors had taken the roof off to start on the second floor addition, we got an early snow and had to catch melting snow/ice in black contractor bags from the sagging ceiling tiles. Or a few months later that spring when I was home alone from school, a man fell through the ceiling before the stairs were built.
I also remember saying to my mother:
“I am NEVER going to live in a house that needs a renovation.”
Famous. Last. Words.
For a while, that was true. I lived in dorms and on and off campus apartments through college and graduate school and my first few years as a professional. But when we moved to Nashville, I knew I wanted an older home. We couldn’t afford one that had been already updated and, often, I didn’t like how they had done it anyway. So we found our current home. Initially we thought we could get by with some cosmetic changes until we were ready to hire contractors to do a bigger renovation. Turns out, that’s really expensive too – especially in Nashville. So we put it off, and put it off, and put it off. Until, when our son was a year old and we still didn’t have a working bathtub, my dad suggested we consider just doing the bathroom renovation ourselves. He would come help with the demolition and get the plumbing and electrical roughed in and we could handle the finishes. We could be done in a matter of months. That sounded like a reasonable plan. As most renovations go, we found more work than we bargained for and renovating mostly on weekends with a toddler is slow going. So, here we are, more than a year later, still trying to finish that first bathroom. And, here I am, living in a state of perpetual renovation. If only my 15 year old self could see me now!
We have learned so much over the last year and become much more confident that there isn’t much we can’t handle with a little hard work. We have learned how to run water and drain lines, level subfloors and ceilings, run electrical, build walls, frame doorways and windows, put up drywall… We’ve gotten side tracked by a leak in the laundry room which resulted in a renovation there too which spilled out into the kitchen with a new coat of paint. And we will never forget that weekend we found out that a river of water was flowing through the crawlspace when it rained washing up a dead possum. If you had told us 2 years ago that would happen and we would fix the possum problem and the water issue without professional help, we wouldn’t have believed you. There is something deeply empowering about embarking on an extensive DIY journey – I’m not sure we will ever stop!
I started out just documenting our progress on Instagram @lifeinafixer but I realized I often had a lot more to say than fits in those tiny squares. So here is where the nitty gritty details about our life and renovations will be!
The fixer herself. One of the first pictures we took of her in 2015.With love, Connor, Hugo, and Me (Annie)